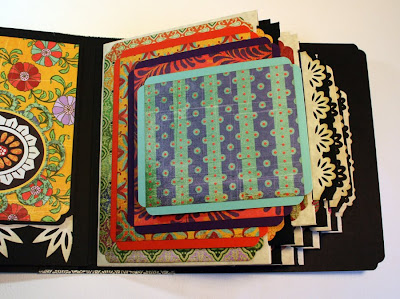
The pattern is available on my website. I am enjoying the fun and bright colors of the Basic Gray Indie Bloom paper collection.
This is a fun project with telescoping pages that have a TON of real estate. The festivities start Saturday night at 8 pm Pacific time. We will be working on the project with breaks to give away a bunch of prizes from out amazing sponsors.
Don't forget, we have a Ustream class Friday night at 7 pm Pacific as well. We will be making the Mix and Match Envelope mini album from my 12th Day of Christmas projects. I will post a supply list in the morning.
Laura
Thursday, December 29, 2011
Sunday, December 25, 2011
Saturday, December 24, 2011
On the TENTH, ELEVENTH, and TWELFTH Days of Christmas Projects.....
...you thought I wasn't going to get them done, didn't you!!
On the Tenth Day, I made a gift card holder for that last SECOND gift:
On the Eleventh Day, I made Paper Punched Napkin Rings for our Holiday table.
And,on the Twelfth Day I made a Mix and Match Table Top Album that uses ANY and all sizes of envelopes. I will be showing how to make this one in more detail on December 30th during my regular Ustream show at 7pm.
I hope you have enjoyed these projects as much as I did. (I caught a cold in the middle and got behind, but pulled it off at the end!!) Doing this each year is my small way of saying thank you to all of you for your support throughout the year. I am so blessed to have so many friends all over the world!!
Happy Holidays to all my friends!!
Laura
Thursday, December 22, 2011
Just a peek...
...here is quick peek at the New Years Eve Scrap Bash Project - Step Forward Mini Album
Wait to you see the interactive component of this one!!! I hope to do a Youtube video sometime tomorrow of the album and I will show it during my regularly scheduled Friday night Ustream class (7 pm Pacific)
Kits for this are available on my website and will start shipping out on Friday. For my Canadian friends I am now offering two shipping options: 1) The same USPS service offered in the past. Shipping time can vary greatly. 2) Fed Ex Ground shipping. This option is a bit more expensive but it is only 5 business days to most locations.
Tomorrow, EVERYONE is home, so I will have to ban them from upstairs to get wrapping done. Where are those PINK Elves when I need them.....
Laura
PS I know you are going to ask....the punches shown are Martha Stewart Deep Edge Aster and EK Success Pointed Flower.
Tuesday, December 20, 2011
On the NINTH Day of Christmas Projects...
...I made a Jewelry Box with a Pop-up lid. This is shown today on the Graphic 45 Blog (www.g45papers.typepad.com) I will be giving more detailed instructions on how to make it on my Ustream class on Wednesday, Dec. 21 at Noon Pacific time.
Here is a quick video so that you can see it in 3D.
To make one you will need:
a 5 1/2" x 5 1/2" Graphic 45 Altered Art Box
Graphic 45 Tropical Travelogue paper (8 x 8)
Cardstock
Gold acrylic painRibbon
Graphic 45 Staples Metal Flower and Button Brad
Glue and adhesives
See you then!! Click on the Ustream logo on my sidebar here to go directly to my channel
Laura
Sunday, December 18, 2011
On the EIGHTH Day of Christmas Projects...
...I made a FAST Beaded Matchbook Mini Album! This one is quick to make for a last minute (okay...maybe an hour two!) gift.
Here's how to make one for yourself:
Cut a 5 1/2" x 8 1/2" card stock for each page of the album. Score and fold at 2 1/8" in from each side. Also, score at 3/4" up from the bottom edge. The two wings should fold in and but up to each other without overlap. Punch the top edge if desired.
Add a 4" x 4" patterned paper matte to both sides.
Add a journaling spot or embellishments to the pages.
Punch holes in the binding edge of all pages. Punch about 1" in from each edge.
Make a 4" x 6" tag for each page pocket. Add patterned paper to the tags if you wish.
For the wrapped cover, cut (2) 4 1/2" x 6 1/2", (2) 3/4" x 4 1/2" and a 1 3/4" x 4 1/2" chip board pieces. Attach these to patterned paper as shown, allowing a 1/2" overhang on all sides and a two-thickness-of-chipboard gap between chipboard pieces. (Seam paper at center of main spine)
Wrap overhang around edges and add lining paper to the inside. Punch holes to match pages in the 3/4" sections of the cover.
Thread a ribbon from the back and through the pages, adding the pages with Pony beads between pages for spacing.
Tie off the ribbon on the front cover.
Add embellishment to the spine to cover the seam in the cover paper. Add a title and embellishments to the cover if you wish.
Check out the Youtube video for more info!
Enjoy this album, it is fun to make!
Laura
Wednesday, December 14, 2011
On the SEVENTH Day of Christmas Projects 2011....
...I made Paper Charms with punched circles.
To create the Tree charm, punch 4 circles: 1 1/4", 1 1/2", 1 3/4" and 2". You will also need a Ideology Memo Pin or beading head pin. Cut all the circles in half along the center line.
To create the Angel charm, you will need three 2 1/4" half circles and a 1 1/2" scalloped circle cut in half. In addition to the Memo Pin or beading head pin, you will also need a pearl headed pin for the angel face. Check out the video for how to assemble the charms.
These charms can be made into necklaces, or charms for albums, tags or as Christmas tree ornaments.
Enjoy!
Laura
Tuesday, December 13, 2011
Welcome to the Graphic 45/ May Arts Blog Hop!
Welcome Blog Hoppers!
Graphic 45 and May Arts are teaming up for an awesome blog hop December 12-16th featuring projects posted on the blogs of both companies design teams. ! There will be tons of inspiration, fabulous prizes, incredible crafts and so much more! Behold the magic that happens when Graphic 45 vintage-inspired papers and embellishments join forces with gorgeous May Arts ribbons! Have fun and get inspired every day of this fantastic blog hop with Graphic 45 and May Arts! Here's some fun information about these two fantastic crafting companies!
Graphic 45 an award-winning scrapbook and paper crafting company— owned and operated by a mother and her two daughters. Together they create vintage inspired crafting products that capture the flamboyant style of the 1920's and 30's - with vibrant color, irresistible texture and imaginative design to create products with decades-old appeal that's both fresh and familiar. Let their products inspire your next scrapbook layout, card, album, altered art project, or home decor DIY project.
May Arts is a ribbon wholesaler, based in Riverside, Connecticut, serving over 16,000 customers worldwide. We offer an exceptional selection of ribbons, including sheer, satin, grosgrain, silk and a variety of patterns and prints. We also maintain a steady stock of inventory so that orders can be fulfilled immediately. As one of the country’s leading wholesalers of decorative ribbons, May Arts has been providing superior products and the highest level of customer service for over 25 years.
See today's schedule for the blog hopbelow. Leave a comment on each of the blogs for your chance to win one of two amazing prize packs. Winners will be randomly chosen and announced on Monday December 19.
Here is the project I have to show you: A Bag Full of Holiday Tags!
This fun project uses a gift bag as a container for a group of tags that can hold photo's and journaling of Christmas Past or Present. It is a fast and fun project that I will be showing you how to make during a FREE Ustream class tommorow, Wednesday, December 13 at Noon Pacific Time. To work along with me you will need a small gift bag (printed or unprinted), a collection of printed paper (Graphic 45 Christmas Emporium, of course!), beautiful ribbons to embellish your tags (May Arts of course!), coordinating card stock and some light to medium weight Chip Board. During class you will learn everything you need to know to make your own Bag Full of Tags! To join in the fun, click on the Ustream logo to the right and you will go directly to my channel. You can just sit back and watch or log in to participate in the LIVE chat during the class. I look forward to "seeing" you there!
Here is the rest of the blogs Schedule for today:
Tuesday, December 13th
Ellen Sosnoski - http://closeyourears.blogspot.com/
Laura Denison - YOU ARE HERE
Charlene Driggs - http://www.paperandinkplayground.com/
Melaine Forbes - www.melanie-forbes.blogspot.com
Jen Shears - http://jenshearsdesigns.blogspot.com/
Don't forget to head to Graphic 45 an May Arts as well:
Graphic 45 Blog: www.g45papers.typepad.com
May Arts Blog: http://www.mayarts.com/blog/
Enjoy the Hop!
Laura
Monday, December 12, 2011
On the SIXTH Day of Christmas Projects....
...I made Caged Ornaments to hold a pair of Earrings or a Charm Dangle. Here's the video on how to make them from the card stock of you choice.
Add embellishments such as Ranger Stickles, glitter, or bling to dress them up further.
Check out the Graphic 45/May Arts Blog Hop tommorrow here on my blog for the fun project we will be making on Wednesday's Ustream show.
Laura
Add embellishments such as Ranger Stickles, glitter, or bling to dress them up further.
Check out the Graphic 45/May Arts Blog Hop tommorrow here on my blog for the fun project we will be making on Wednesday's Ustream show.
Laura
On the FIFTH Day of Christmas Projects 2011...
I made a Luminaria Stocking Holder!
This was made from a Graphic 45 Altered Art Box, some vellum and punches and those nifty battery operated voltive candles. Check out this video to find out how to make your own!!
Check back later today for the 6th Day of Christmas project as I try to get back on track. We had a fun family weekend putting up our tree and I didn't spend as much time in the studio. Now the trick is to keep the kittens OUT of the tree for their fist Christmas!!
Laura
Friday, December 9, 2011
Stack The Deck Mini Album Series Pattern is up.....
The Stack the Deck Mini Album Series pattern is up on the website. I will be following this pattern for the next two projects on Ustream. This takes the albums shown on my 12 Projects of Christmas to a higher level. It contains instruction for FOUR different album versions. Tonight we will make the paper Bag version and next week we will make the Flaps and Pockets version.
The kits using the Simple Stories Year-o-graphy and 25 Days of Christmas for the Flaps and Pockets Version are also up on my website.
Wednesday, December 7, 2011
On the FOURTH Day of Christmas Projects 2011...
Tuesday, December 6, 2011
ON the THIRD Day of Christmas Projects....
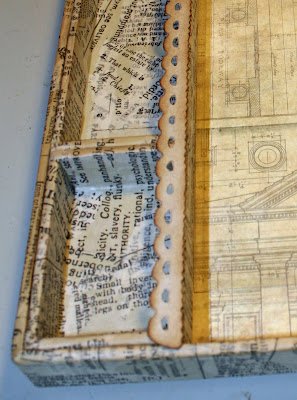
...I made a Message Center. This message center is created form an Ideology Printer Tray. You won't use all of the configurable insert boxes, so I will show you how you can use those with tomorrow's project.
It has a perpetual calender at the top, a write-on surface. cork message strips, memorabilia niche's, and bottom trays for coins, keys, etc.
Here is how to make it:
Remove all the configurable box inserts from the tray. You will need two 1 3/4" x 2 3/4" and a 1 3/4" x 5 1/2" box for the top row, three 1 3/4" x 1 3/4" and two 1 3/4" x 2 3/4" for the lower row and four 2 3/4" x 2 3/4" boxes for the lower trays. Glue boxes together in rows and cover with Ideology Tissue Wrap. Cover the edges of the tray as well.
To cover the boxes, tear the tissue into smallish pieces and apply with Ranger Glue and Seal. This stuff is great! Nice matte finish and it dries to a "dry" touch.....not sticky!
Trim and attach a sheet of scrapbook paper to the center of the tray.
Glue the upper row of boxes in place
For added security, attach the tray section with glue AND some brads to the bottom rail of the tray.
Glue the lower row in place just above the tray.
Add a punched or die cut strip to the bottom edge of the upper row to help hold the calender tickets in the compartments.
Add a piece of lightweight acrylic over the center paper. Add a punched or die cut strip to cover the attachment at the top and bottom.
Add cork strips to each side of the center section.
Add perpetual calender dates and other embellishments to match your theme.
To hang on the wall add Ideology Charm loops to the back upper edge with brads.
This would make a great gift....even for yourself!!
Check in tomorrow for a project to use the leftover boxes!
Laura
Products used:
Printer Tray, Tissue Wrap, Crowded Attic paper, Memo Pins, Hinge Clips, Charm Hangers, Long Brads, Grunge Paper by Tim Holtz Ideology
Vintage Lace Die by Sizzix Alterations
Flowers by Prima
Cork Strips from Office Depot
Butterfly Stickers by K and Company
It has a perpetual calender at the top, a write-on surface. cork message strips, memorabilia niche's, and bottom trays for coins, keys, etc.
Here is how to make it:
Remove all the configurable box inserts from the tray. You will need two 1 3/4" x 2 3/4" and a 1 3/4" x 5 1/2" box for the top row, three 1 3/4" x 1 3/4" and two 1 3/4" x 2 3/4" for the lower row and four 2 3/4" x 2 3/4" boxes for the lower trays. Glue boxes together in rows and cover with Ideology Tissue Wrap. Cover the edges of the tray as well.
To cover the boxes, tear the tissue into smallish pieces and apply with Ranger Glue and Seal. This stuff is great! Nice matte finish and it dries to a "dry" touch.....not sticky!
Trim and attach a sheet of scrapbook paper to the center of the tray.
Glue the upper row of boxes in place
For added security, attach the tray section with glue AND some brads to the bottom rail of the tray.
Glue the lower row in place just above the tray.
Add a punched or die cut strip to the bottom edge of the upper row to help hold the calender tickets in the compartments.
Add a piece of lightweight acrylic over the center paper. Add a punched or die cut strip to cover the attachment at the top and bottom.
Add cork strips to each side of the center section.
Add perpetual calender dates and other embellishments to match your theme.
To hang on the wall add Ideology Charm loops to the back upper edge with brads.
This would make a great gift....even for yourself!!
Check in tomorrow for a project to use the leftover boxes!
Laura
Products used:
Printer Tray, Tissue Wrap, Crowded Attic paper, Memo Pins, Hinge Clips, Charm Hangers, Long Brads, Grunge Paper by Tim Holtz Ideology
Vintage Lace Die by Sizzix Alterations
Flowers by Prima
Cork Strips from Office Depot
Butterfly Stickers by K and Company
Sunday, December 4, 2011
On the SECOND Day of Christmas....
....I am a day late, but at least it is up!!
I made Paper Rosette Angels!
To make these, you will need:
White Cardstock: Cut to 3" x 4 1/2". Score and accordion fold every 1/4"
Cream Cardstock: Cut to 3/4" x 5". Score and accordion fold every 1/4"
White Vellum: Cut TWO at 1 3/4" x 5 1/2". Score and accordion fold every 1/4"
Score your pieces BEFORE punching the edges....it is much easier! Fold after you punch. You will also need two 3/4" circles to hold the rosette front and back. For the Face you will need a 1/2" circle. For the halo and arms, you will need two 3/4" rings of cardstock. You can also add a flower or other embellishment. Watch the video below for further instruction.
Use these as ornaments or fun gift decorations.
Enjoy
Laura
Thursday, December 1, 2011
On the FIRST Day of Christmas Projects 2011...
Welcome to the TWELVE DAys of Christmas Projects 2011! Every other day until December 23rd, I will have a new project to share with you via Youtube and a tutorial here on my blog. Enjoy!!
On the FIRST Day of Christmas Projects I have a super quick and easy mini album to share with you! This fun binding style - I am calling it Stack the Deck Binding - is quick and versatile. (I will have two different uses for a variation of this binding next week during the next two Ustream classes)
To make this binding you will need some card stock and envelopes in the size and color of your choice.
Seal you envelopes closed. Cut off the side that you want next to the binding and the side opposite it....just a sliver unless you want your envelope smaller. You envelope will look like a tube. Measure the length of the opening of your envelope.
Cut your Stack the Deck binding using this dimension for the height of you pieces. The first will be 1 3/4" wide, the second is 2 1/4" wide and the third is 2 3/4". This will give you 6 pages. For more pages, add 1/2" to the width of the previous piece.
Score and fold 3/4" in from each side. The channel in the center should get larger by 1/2" from one piece to the next. Add adhesive to the back side of each channel.
Attach the layers together - STACK THE DECK! - by centering the pieces on top of each other.
Apply adhesive the the Stack the Deck binding unit to each side of each fin. Slip the open edge of the envelope over the fin....you have a page. Repeat for all pages.
Create a chipboard cover with the spine piece 1/2" wider than the widest piece in your stack. Attach stacked pages to the spine.
Add photo mattes and embellishments.
For the envelope piggy back version, you will need envelopes in two sizes. The larger envelope will be the page base and is sandwiched between the smaller envelopes. Seal the envelopes closed and slice open the center envelope as above. Slice only the top edge of the smaller envelopes. Attach to the Stack the Deck Binding in the same way as the above pages.
Add tags, embellishments and a chip board cover as above.
Check out my Youtube video for a more detailed tutorial.
Enjoy your project!
Laura
Subscribe to:
Posts (Atom)